On a spare, geriatric, Asus Zenbook there lives a Home Assistant Operating System (HAOS) running inside a QEMU/KVM instance, because I wanted to control my ThirdReality light bulbs via Zigbee protocol. Parts of this process were unconventional, but they now workTM.
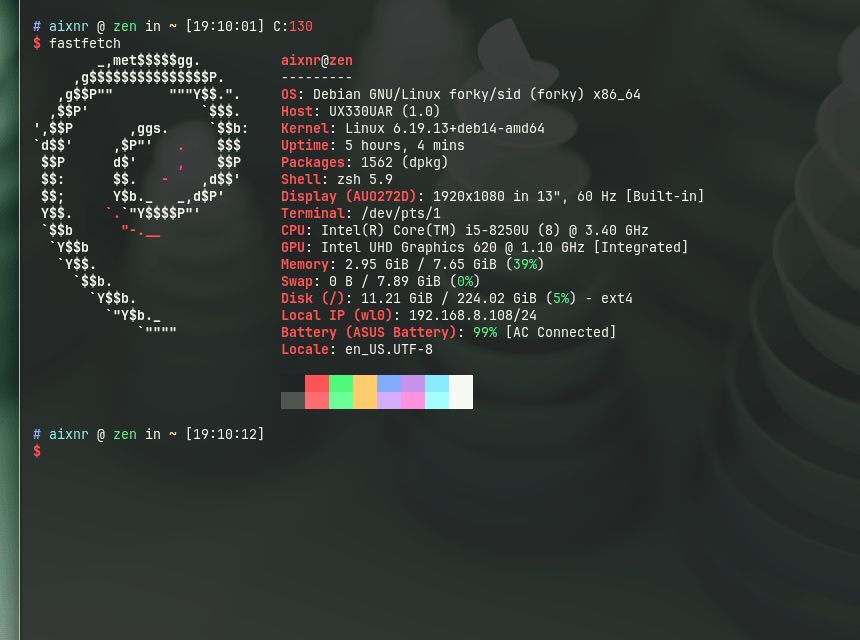
- The machine is Asus Zenbook UX330U (purchased in 2018), Intel i5-8250U (3.40 GHz 4c/8t) with 8GB LPDDR3 and 256 GB M.2 SSD.
- Base operating system is Debian (netinstall, v14
forkytesting) with Xfce4 desktop. - Networking is managed by
systemd-networkd&iwd(instead ofNetworkManager). - HAOS runs on QEMU/KVM, installed with
virt-installand managed byvirsh. - Zigbee adapter connection to HAOS goes through
ser2netTCP port instead of QEMU USB passthrough. - Port-forwarding for port
:8123is done withiptables, managed by alibvirtdhook. - WireGuard for remote connectivity outside home LAN.
I can now toggle my light bulbs remotely…

… all controlled from this ultrabook:
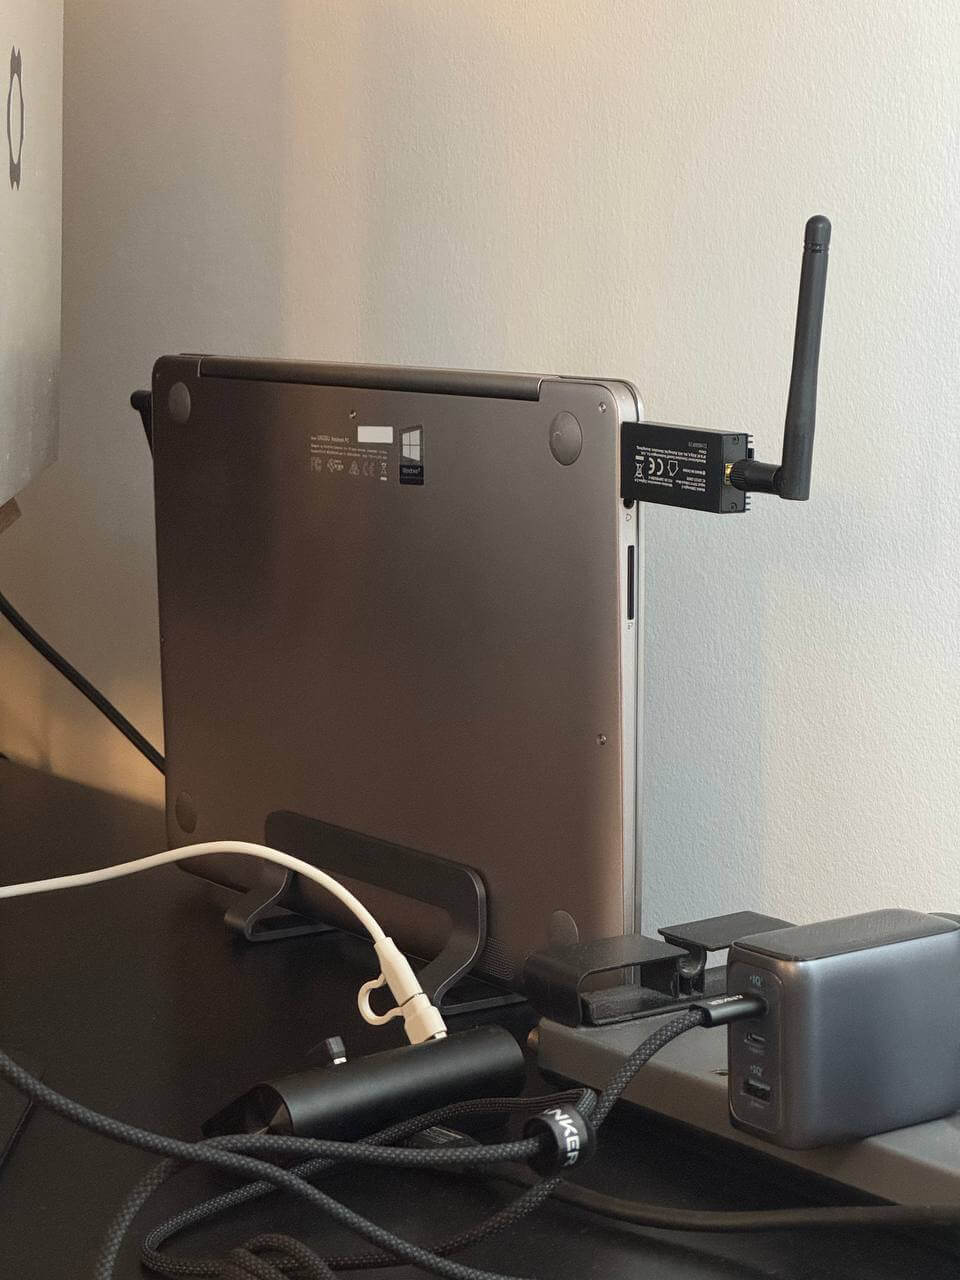
Table of Contents:
The Experimentation And The Failures
Initially I had assumed that systemd-nspawn would be good installation strategy.
After some rounds of configuration, then I learned that Core and Supervised installation methods were deprecated; see Deprecating Core and Supervised installation methods, and 32-bit systems.
On a separate note, I had initially envisioned to set up a br0 bridged networking adapter the way I did for another home server unit, but it would be completely managed by systemd-networkd instead of a cron job running a shell script at boot.
However, I then learned that slaving wireless adapter to a bridge adapter will not work due to protocol limitations.
Typically, a wired NIC (e.g., eth0) is slaved to a bridge adapter without much issues.
All in all, I scrapped the systemd-nspawn setup, but remained discussed at the end of this write-up.
Affected Files
Files affected throughout the process.
/etc/apt/sources.list, usingtestingrepository instead oftrixiestable./etc/udev/rules.d/10-rename-wl.rules, to rename my wireless adapter fromwlp2s0towl0(for no technical reason, just for simplicity)./etc/systemd/network/wl0.network, where the adapter is matched by its MAC address./etc/resolv.conf, originally managed byNetworkManager. BecauseNetworkManagerwas disabled, it was managed bysystemd-resolvedafter it was installed./etc/udev/rules.d/99-wifi-powersafe.rules, invokingiwto prevent WiFi from sleeping./etc/systemd/logind.confto prevent system from sleeping when the lid is closed./etc/libvirt/hooks/qemu, alibvirtdshell script for setting upiptablesrules to port-forward:8123./etc/ser2net.yaml, the configuration file forser2netdaemon; managed bysystemd./etc/wireguard/wg0.conffor configuring WireGuard connection.
LLM Statement
LLM did not write this article.
LLM (Claude Sonnet 4.6), however, pointed me to ser2net after my frustration failing to pass my Zigbee adapter through the KVM instance.
Or rather more accurately, while I could see /dev/ttyUSB0 inside the KVM instance, Home Assistant could not establish connections to it.
Sonnet also helped me with iptables by clarifying the rules that libvirt inserted into iptables and the many chains it created automatically while I was trying to figure out if I could instead write the rules in nftables.
This was the time when there were reports claiming that Sonnet 4.6 providing subpar answers, I then switched to Gemini 3 Flash Preview through OpenRouter with locally-hosted Open WebUI to help me demystify Linux networking stack with iptables.
Debian Installation And Configuration
Live installation session is not covered here; it was a bog-standard Debian installation with guided partitioning, using LVM and EXT4.
# Drop into root console
su -

# Add $USER to sudo group
# Log out the session to take effect
usermod -aG sudo myuser

# remove unneeded packages prior to upgrading distribution version
sudo apt remove libreoffice-*
The installation defaulted to Debian stable, codenamed trixie as of writing.
The original /etc/apt/sources.list was first backed up, and then all instances of trixie were changed to testing:
deb http://deb.debian.org/debian/ testing main non-free-firmware
deb-src http://deb.debian.org/debian/ testing main non-free-firmware

deb http://security.debian.org/debian-security testing-security main non-free-firmware
deb-src http://security.debian.org/debian-security testing-security main non-free-firmware

deb http://deb.debian.org/debian/ testing-updates main non-free-firmware
deb-src http://deb.debian.org/debian/ testing-updates main non-free-firmware
… once modified:
# Full system upgrade after distribution version switch
sudo apt update && sudo apt dist-upgrade
sudo apt autoremove && sudo apt clean

# Important packages
sudo apt install curl fastfetch btop htop neovim \
  tmux lazygit build-essential ncdu net-tools git zsh fzf \
  trash-cli bat prettyping eza

# No need to bring up login GUI
sudo systemctl disable lightdm
For absolutely no reason, I created a udev rule to rename my wireless adapter from wlp2s0 to wl0:
SUBSYSTEM=="net", ACTION=="add", ATTRS{address}=="f8:63:3f:e2:4a:1e", NAME="wl0"The MAC address for my wireless adapter was shown by the ip link command.
Since this is a laptop, and closing the lid means something to the OS, we need to override the default sleep behavior when the lid is closed.
First, I updated /etc/systemd/logind.conf to ensure the following directives under the [Login] clause were uncommented with the appropriate values:
HandleLidSwitch=ignore
HandleLidSwitchExternalPower=ignore
HandleLidSwitchDocked=ignore
… and followed by these commands:
sudo systemctl restart systemd-logind
sudo systemctl mask sleep.target suspend.target hibernate.target hybrid-sleep.target
Additionally, I instructed iw to disable power-saving feature on the wireless adapter through a udev rule:
ACTION=="add", SUBSYSTEM=="net", NAME=="wl0", RUN+="/usr/sbin/iw dev wl0 set power_save off"After a system restart, I confirmed this power-saving rule took effect:
sudo iw dev wl0 get power_save
# prints: Power save: off
I also installed oh-my-zsh with git and fzf plugins enabled and to use ys theme, as well as LazyVim for a nicer nvim experience.
Networking Configuration
Having both NetworkManager.service and systemd-networkd.service enabled and running led to a longer booting process, contributed by {NetworkManager,systemd-networkd}-wait-online.service.
To exclusively use systemd-networkd.service, wireless interface management now falls under iwd; this iwd package must be installed prior.
Unlike wpa_supplicant, there is no config file to manage.
iwd or wpa_supplicant
Initially I looked into wpa_supplicant for managing my wireless connectivity.
From my quick reading, iwd (iNet wireless daemon) is the modern and performant alternative to wpa_supplicant.
Of note, the default backend of NetworkManager is wpa_supplicant itself.
iwd comes with iwctl console for managing connections, similar to nmtui for NetworkManager.
IMHO, nmtui has superior aesthetics with its ncurses-based TUI, while iwctl is just a console.
# Before anything, install iwd first!
sudo apt install iwd

# Disable and mask NetworkManager
sudo systemctl stop NetworkManager && sudo systemctl disable NetworkManager && sudo systemctl mask NetworkManager
sudo systemctl mask NetworkManager-wait-online.service

# Disable and mask wpa_supplicant
sudo systemctl stop wpa_supplicant && sudo systemcl disable --now wpa_supplicant
sudo systemctl mask wpa_supplicant

# Connect to an access point
sudo iwctl station wl0 connect "SSID name"

# Verify connectivity
sudo iwctl station wl0 show

# Enable at boot
sudo systemctl enable --now iwd
systemd-networkd needs to know that it is now responsible for wl0; iwd only handles connecting to the access point as it does not handle DHCP leasing.
[Match]
MACAddress=f8:63:3f:e2:4a:1e

[Network]
DHCP=yes
Because of my /etc/udev/rules.d/10-rename-wl.rules, matching with name=wl0 somehow did not work.
The alternative is to match by MACAddress= instead.
# Enable systemd-networkd
sudo systemctl enable --now systemd-networkd
Between now (enabling systemd-networkd) and then (installing systemd-resolved), the file /etc/resolv.conf was practically empty.
Thus, apt install will fail because there was no local DNS resolution.
In the meantime, I manually populated the file:
nameserver 1.1.1.1
nameserver 8.8.8.8
Then, apt should be able to resolve for DNS.
Note that systemd-resolved automatically starts after installation and immediately manages the /etc/resolv.conf file by symlinking it from its stub file, stub-resolv.conf.
Additionally, systemd-resolved also runs its own DNS server.
# systemd-resolved is not installed by default on Debian netinstall
sudo apt install systemd-resolved
A ping test to, for example google.com, can verify the DNS resolution is working.
HAOS Installation
The required packages must first be installed.
sudo apt install qemu-system-x86 qemu-utils libvirt-daemon-system libvirt-clients virtinst bridge-utils
sudo systemctl enable --now libvirtd
sudo usermod -aG libvirt $USER
newgrp libvirt
HAOS .qcow2 image was downloaded and placed within /var/lib/libvirt/images/.
curl -SLO "https://github.com/home-assistant/operating-system/releases/download/17.2/haos_ova-17.2.qcow2.xz"
unxz haos_ova-17.2.qcow2.xz
sudo mv haos_ova-17.2.qcow2 /var/lib/libvirt/images
Instead of running a HAOS instance directly using the downloaded haos_ova-17.2.qcow2 (1.0 GiB), I created an overlay image with qemu-img create command:
sudo qemu-img create \
  -f qcow2 -F qcow2 \
  -b /var/lib/libvirt/images/haos_ova-17.2.qcow2 \
  /var/lib/libvirt/images/haos.qcow2
With this, now we have:
/var/lib/libvirt/images/haos_ova-17.2.qcow2: the original image, untouched./var/lib/libvirt/images/haos.qcow2: the overlay filesystem, used by the KVM instance.
Before installing HAOS with the virt-install command, I first brought up the default network interface.
# Configure the default networking
sudo virsh net-start default
sudo virsh net-autostart default

# Verify
sudo virsh net-list --all
… afterwards, we install HAOS (2 vCPUs, 3 GB RAM):
sudo virt-install \
  --name haos \
  --description "HomeAssistant OS" \
  --os-variant=generic \
  --ram=3072 \
  --vcpus=2 \
  --disk /var/lib/libvirt/images/haos.qcow2,bus=scsi \
  --controller type=scsi,model=virtio-scsi \
  --import \
  --graphics none \
  --boot uefi \
  --network network=default

# Once exiting the shell, verify the VM status
sudo virsh list --all

# Enable instance autostart
sudo virsh autostart haos
The default user, root, comes with no password for shell access.
Under this default networking, QEMU/KVM instances are connected to the virbr0 virtual bridge interface provisioned by libvirtd, with the gateway IP address (i.e., the host) being 192.168.122.1.
By default, the allocation of IP address to the QEMU/KVM instances is dynamic, and the instance itself is not accessible to the local network.
I (a) prefer static IP, and (b) the Home Assistant port :8123 must somehow be made accessible to the local devices.
I solved for (a) with a simple config update, and for (b) with a libvirtd hook that manipulates iptables.
Solving for (a) looks like so:
sudo virsh domifaddr haos
# prints:
#  Name    MAC address         Protocol   Address
# ------------------------------------------------------------
# vnet0   52:54:00:d4:74:bb   ipv4       192.168.122.224/24

# Update the 'default' networking; careful with the MAC address and the IP
sudo virsh net-update default add ip-dhcp-host \
  "<host mac='52:54:00:d4:74:bb' ip='192.168.122.224'/>" \
  --live --config
This HAOS instance now has a static IP address of 192.168.122.224.
On editing config
Here I patched the default networking config directly.
Alternatively, I could issue sudo virsh net-edit default (instead of net-update) to summon a text editor to view the whole content of the config and edit/insert/append the necessary lines.
Physically, on disk, this default config is saved as default.xml at /etc/libvirt/qemu/networks.
… and for dealing with (b) on libvirtd hook:
sudo touch /etc/libvirt/hooks/qemu
sudo chmod +x /etc/libvirt/hooks/qemu
… then populate the qemu hook (essentially a shell script):
#!/bin/bash
if [ "$2" == "started" ] || [ "$2" == "reconnect" ]; then
  # FORWARD rule (Permission: Allow traffic to pass THROUGH the host to reach the VM)
  iptables -I FORWARD -p tcp -d 192.168.122.224 --dport 8123 -j ACCEPT

  # NAT rule (Translation: Rewrite packet destination from Host-IP to VM-IP)
  iptables -t nat -I PREROUTING -p tcp --dport 8123 -j DNAT --to-destination 192.168.122.224:8123
fi
I confirmed these rules were applied when the QEMU/KVM instance is running:
sudo iptables -L FORWARD -n --line-numbers
sudo iptables -t nat -L PREROUTING -n --line-numbers
… and crucially, that I can access my Home Assistant web interface from anywhere within my local network by hitting my laptop’s IP address at port :8123 on my web browser.
On iptables and networking
I may have executed dozens of iptables commands, yet my understanding of them, and the linux networking stack in general, is very poor.
By default, libvirtd imposes default deny strategy, as defined inside the LIBVIRT_FWI (forward inbound, world -> VM) chain.
There are two strategies to add new rules, either with -A (append) or with -I (insert).
Initially, I did -A, which added new rule allowing access to :8123.
This did not work because the position of the rule is meaningful, the default-deny rule takes precedence.
With -I, new rules are added at the top.
As a refresher, iptables has a hierarchy of tables (e.g., filter, nat, etc.), which contain chains (PREROUTING, FORWARD, INPUT, or custom chains such as LIBVIRT_FWI), which contain rules.
The default table is filter, hence that is why -t nat must be specified to insert new rules to the nat table, otherwise it will be inserted to the filter table instead.
iptables is not the easiest thing to learn either.
On some of my servers, I instead use nftables, with the benefit being the maintenance of rules happens inside /etc/nftables.conf, self-documenting with commentable lines.
I could not figure out the quick way to use nftables in this case because libvirtd operates with iptables.
All those sum up the process of running a QEMU/KVM instance with libvirtd through the virsh and virt-install tool.
HAOS configuration through its web interface is not covered here.
At the end of installation and when everything was running, I checked the size for the overlay image.
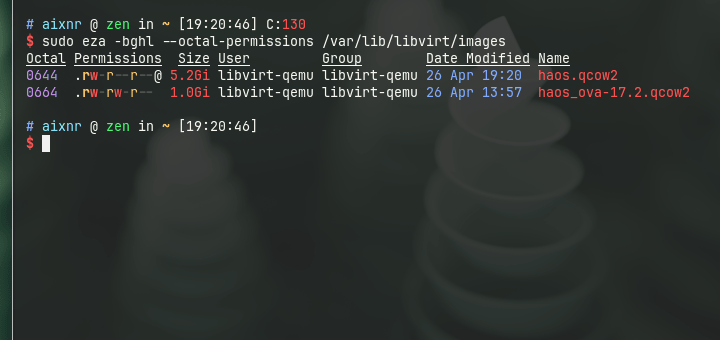
5.2 GiB for the overlay??! What happened along the way?? To inspect, the VM must be powered off first.
sudo virsh shutdown haos
# virt-diff is part of libguest-tools package
sudo apt install libguestfs-tools
# Check utilization on the backing image
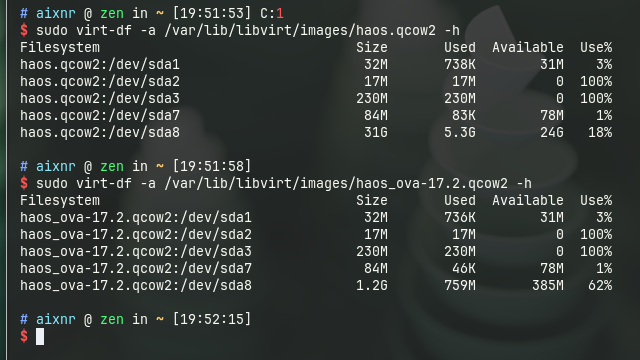
sudo virt-df -a /var/lib/libvirt/images/haos_ova-17.2.qcow2 -h
# Check utilization on the overlay image
sudo virt-df -a /var/lib/libvirt/images/haos.qcow2 -h
# After inspection, power the VM back up
sudo virsh start haosStark contrast in size for /dev/sda8 between the two.
I first tried using virt-diff, but it did not return anything to the stdout, hence why I used virt-df.
To see what actually changed, that would be an exercise for a different day.
Zigbee Adapter Configuration
Surprisingly, once configured, it was plug and play! To get it to work with HAOS within a QEMU/KVM instance, however…. was the challenge. SONOFF Zigbee adapter (link on Amazon) is a USB serial adapter device, and this adapter is required to talk with Zigbee devices. Home Assistant supports controlling Zigbee devices when this adapter is present.
My attempt at passing through /dev/ttyUSB0 from host to the KVM instance for HAOS to use was not successful.
Fortunately, ser2net (serial-to-net; installation required and its service starts up right after installation) can expose a TCP port of a serial device.
# Rest of the lines were commented
connection: &con1
  accepter: tcp,20108
  connector: serialdev,/dev/ttyUSB0,115200n81,local
  options:
    kickolduser: true
I knew the Zigbee adapter is identifiable at /dev/ttyUSB0 based on the sudo dmesg | grep tty output, with the identifying string cp210x.
The ser2net service was restarted after the config update.
ser2net configuration file confusion
Issuing sudo ser2net automatically reads /etc/ser2net/ser2net.yml, and then exists with a status of 0 with no message in the stdout/stderr, while its process is running in the background.
However, the unit file ser2net.service (located at /usr/lib/systemd/system/) references env $CONFFILE (defined in /etc/default/ser2net), points to /etc/ser2net.yaml as its configuration.
If sudo ser2net is issued and nothing happened, check on htop or btop, or with pgrep.
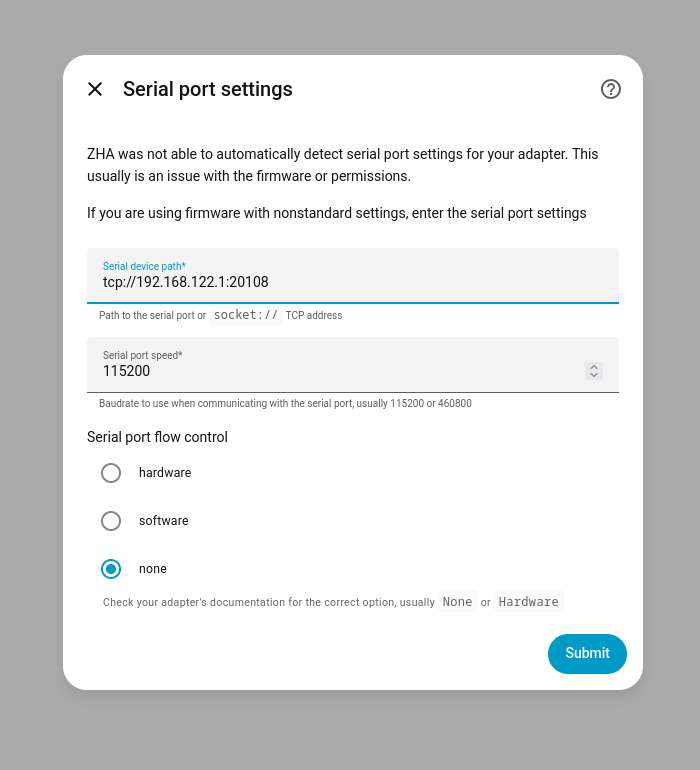
The KVM host IP (gateway) is 192.168.122.1, which means HAOS should be able to see tcp://192.168.122.1:20108 TCP port to reach this Zigbee adapter.
We can check if port :20108 is reachable with nc (i.e., netcat) on the HAOS, assuming the Terminal & SSH addon is installed.
nc -zv 192.168.122.1 20108
# prints: 192.168.122.1 (192.168.122.1:20108) open
On the HA web interface, under Settings page, a new Zigbee Home Automation integration can be added.
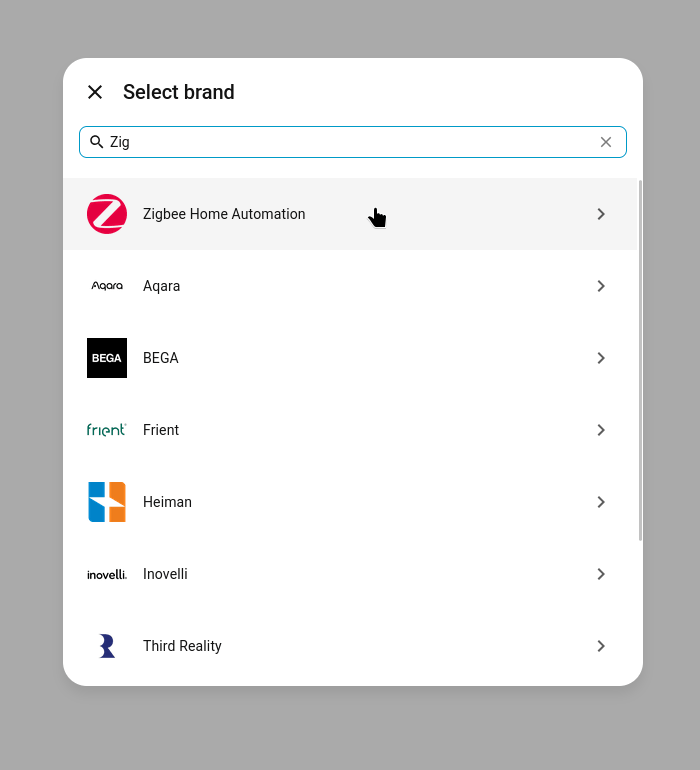
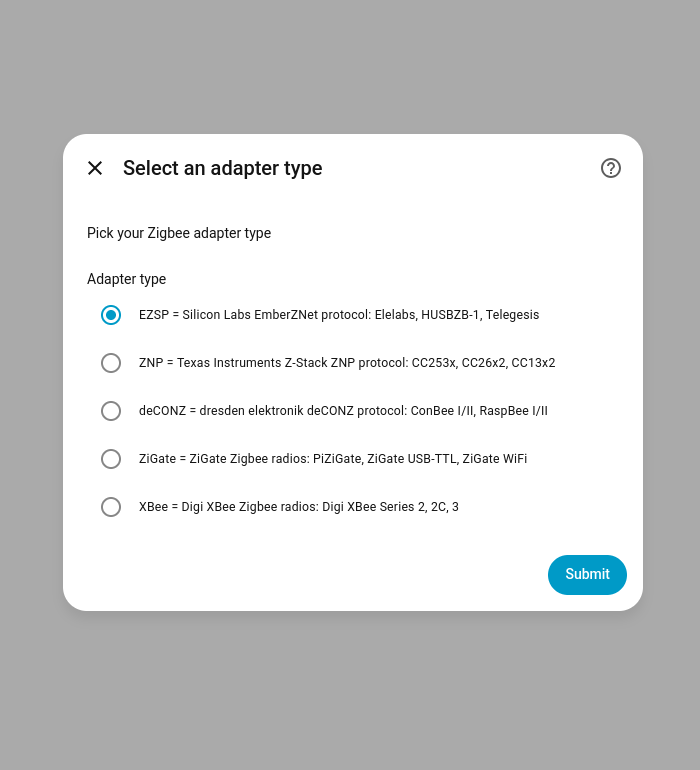
The adapter, CP210x, is manufactured by Silicon Labs.
HA identified and configured the adapter by addressing it at tcp://192.168.122.1:20108, where 192.168.122.1 is the libvirtd host gateway IP address, and 20108 is the ser2net port for /dev/ttyUSB0.
The many attempts I tried with /dev/ttyUSB0 passthrough that did not work, this ser2net method was completed in less than 2 minutes, painlessly!
ThirdReality Zigbee Light Bulb
On first activation, it goes into pairing mode. Once paired, it will not be discoverable anymore for pairing (makes sense). To trigger pairing mode, toggle the bulb on/off 5 times in a row. The bulb would then cycle through colors, indicating it is now ready to pair.
Networking and Remote Access
Tailscale, Netbird, and Pangolin are popular solutions for remote networking. I have been running a vanilla WireGuard networking for 7 years now since 2019, and had tested Nebula Overlay for a short period of time. I considered trying out Tailscale given how much the community loves and adores them, but I decided it would be a venture to pursue in the future. I watched videos and thought that Tailscale is very convenient, borderline magic (not a criticism).
WireGuard and a public-facing VPS
Self-hosted Netbird and Pangolin require public-facing IP address, and so does WireGuard. Tailscale is the great alternative since the public networking is handled by them. The details on provisioning a VPS (or any cloud instance) followed by setting up a WireGuard server are out-of-scope.
sudo apt install wireguard

# Asymmetric private/public key generation
wg genkey | sudo tee /etc/wireguard/private.key
sudo chmod go= /etc/wireguard/private.key
sudo cat /etc/wireguard/private.key | wg pubkey | sudo tee /etc/wireguard/public.key
With the private and public keys generated, wg0.conf could now be populated.
[Interface]
Address = 10.0.0.101/32
PrivateKey = client_private_key

[Peer]
PublicKey = server_public_key
Endpoint = site.example.com:51820
AllowedIPs = 10.0.0.1/32
PersistentKeepalive = 25
Of note, only 10.0.0.1/32 (my WireGuard gateway) is reachable by this server.
Otherwise, I would have written it as 10.0.0.0/24 to allow for subnet-wide access.
In this case, this server can only reach 10.0.0.1, but other devices in the subnet can reach this server just fine.
sudo systemctl enable --now wg-quick@wg0
sudo systemctl status wg-quick@wg0
sudo wg show
For additional measures, restrictions could be placed on the WireGuard server’s nftables to block certain devices from accessing certain resources.
Containerization But Without Docker
In 2024, I ran a conventional email stack (Postfix, Dovecot, Roundcube) within a systemd-nspawn container, and it was a good experience setting it up such way.
Thanks to Christoph Haas for the email guide; see ISPmail Guide for Debian Bookworm.
I chose systemd-nspawn as the container technology out of curiosity.
Also, it was chosen because the host container was a KVM VPS, which limited my options to Docker, Podman, LXD, and of course systemd-nspawn.
sudo apt install debootstrap# Within root console
su -
sudo mkdir -p /var/lib/machines
cd /var/lib/machines
debootstrap --arch amd64 \
--include=systemd-container,systemd,dbus,systemd-resolved,htop,net-tools \
stable \
hass# After exiting the root console
sudo machinectl start hass
sudo machinectl shell hass
# Somehow lists QEMU/KVM instances as well
sudo machinectl listAffected files (host):
/etc/systemd/nspawn/hass.nspawn: container-specific configuration./etc/systemd/network/ve-hass.network: container-specific MACVLAN.
[Network]
VirtualEthernet=yes
Port=tcp:8123:8123

[Files]
BindReadOnly=/etc/resolv.conf[Match]
Name=ve-hass
[Network]
Address=10.1.0.1/24
IPMasquerade=yes# System-level dependencies
apt install build-essential python3-dev ffmpeg isal libturbojpeg0 tmux libpcap-dev
mkdir -p /src/homeassistant
cd /src/homeassistant
uv venv --python 3.13
uv pip install zlib-ng homeassistantAffected file (container):
/etc/systemd/network/host0.networkfile for the virtual ethernet.
[Match]
Name=host0

[Network]
Address=10.1.0.2/24
Gateway=10.1.0.1
DNS=1.1.1.1
DNS=8.8.8.8
After learning that the Home Assistant core installation method was no longer supported, I pivoted to the QEMU/KVM installation method.
Home Assistant and the Many Possibilities Ahead
Raspberry Pi Pico introduced me to the world of microcontroller programming, with my first attempts running a humidity and temperature sensor using CircuitPython, sending data via the MQTT protocol to a local server running Prometheus for visualization by Grafana. ESPHome is a tool I would like to try since I have several ESP dev boards around, including the teeny-weeny XIAO ESP32-C6 by Seeed Studio, which is also a Zigbee-capable device. Along the way, I learned that for IoT applications, Zigbee is better than WiFi because of its ultra-lower power consumption, but only suitable for devices that are not chatty and do not require high data bandwidth. This is one of the best fits for sensors and switches.
I look forward to trying out Zigbee automation using ESP32 microcontrollers with Arduino.
On a separate note, I noticed a recent trend using old laptops as home server. I once considered a used Thinkpad T480 in the past because, among others, it comes with a full-size RJ45 GbE port. No dongles needed. On eBay, used Thinkpad T480 laptops were priced between $300 – $400 in the United States, depending on the spec. Aside from their size (small, no need a server rack) and the cost (quite cheap but still with good performance), they are battery-powered that can survive power outage for some time, and the internals are serviceables with common tools. Not a substitute for a UPS, but it works really well on a budget!
After adding one to my cart on eBay, I remembered an old Zenbook that was once my grad school sweetheart. That 8GB of RAM thrived running VS Code and a Debian VM before it became too much, which I then purchased an Asus ROG that carried my Jupyter sessions and outlasted my abuse the remainder of my grad school.